1. Code sample and notes
The code for this presentation is available at https://github.com/danhyun/2016-jeeconf-rapid-ratpack-java.
These notes are also available in PDF format.
2. Goal
-
Produce a REST API in Java to manage Todos.
-
Pass specifications @ todobackend.com
-
Plug into a Todo Frontend app
3. Tools
-
Ratpack (Web server)
-
Gradle (Build tool)
4. What is Ratpack?
Ratpack is a set of developer friendly, reactive, asynchronous, non-blocking Java 8 libraries that facilitate rapid web application development.
-
Lightweight
-
No SDK binaries download
-
No intermediary code generation
-
-
Doesn’t implement Servlet Specification.
-
Uses Netty for underlying network programming
-
No Servlets
-
No Servlet Container
-
-
Not "Fullstack" not MVC; Functionality is provided via "modules"
-
Core (HTTP/Execution)
-
Sessions/Auth Pac4j
-
Database (HikariCP)
-
RxJava/Hystrix
-
Templating (Groovy’s MarkupTemplateEngine, Handlebars, Thymeleaf
-
Dependency Injection (Guice/Spring Boot)
-
-
First class testing support
-
Test framework agnostic fixtures that let you test around every feature of Ratpack
-
5. Why not Maven?
Because Ratpack is simply a set of Java libraries, all that is required to build Ratpack applications are the Ratpack jar files and javac.
You are free to use any build tool: Ant + Ivy, Maven, Gradle, etc.
Ratpack has first-class Gradle support provided via Ratpack’s Gradle plugin. It allows for easy dependency management (keeps versions of modules in sync) and hooks into Gradle’s continuous functionality.
Can you create a Maven pom.xml file from memory?
I certainly cannot.
I can create a build.gradle file from memory though.
plugins { (1)
  id 'io.ratpack.ratpack-java' version '1.3.3' (2)
}

repositories {
  jcenter() (3)
}| 1 | Make use of Gradle’s incubating Plugins DSL (since Gradle 2.1) |
| 2 | Declare and apply Ratpack’s Gradle plugin for Java, provides ratpack-core module |
| 3 | Tell Gradle to pull dependencies from Bintray JCenter |
Gradle has a number of out of the box features that make it superior to Maven however the one I will highlight here is the Gradle Wrapper.
The Gradle Wrapper is a set of files that enables developer on a project to use the same exact version of Gradle.
This is a best practice when it comes to working with Gradle.
Because Gradle is such a well maintained build tool, there are many updates.
The Gradle Wrapper goes a long way towards preventing "works on my machine" syndrome.
Wrapper scripts are available in bash and bat formats.
Because the scripts are typically a part of the project, you don’t need to install Gradle to use it, just use the gradlew scripts.
At some point however, someone somewhere needs to install gradle.
I recommend installing http://sdkman.io to manage Gradle installations.
To generate the wrapper, invoke gradle wrapper from the command line.
When generating scripts from Windows, make sure to chmod +x gradlew so that your *nix/Mac co-workers and CI server can execute the wrapper script.
|
6. Привіт Світ
Getting started in Ratpack is a non-event. You may be accustomed to jumping through hoops to get a new web project started. To demonstrate Ratpack’s low effort project initialization consider the Gradle build file and the associated Java main class.
plugins {
  id 'io.ratpack.ratpack-java' version '1.3.3' (1)
}

repositories {
  jcenter()
}

mainClassName = 'HelloWorld' (2)| 1 | Apply Ratpack Gradle plugin |
| 2 | Tell Gradle to use HelloWorld as main Java class |
import ratpack.server.RatpackServer;

public class HelloWorld {
  public static void main(String[] args) throws Exception {
    RatpackServer.start(serverSpec -> serverSpec (1)
      .handlers(chain -> chain (2)
        .get(ctx -> ctx.render("Привіт Світ")) (3)
      )
    );
  }
}| 1 | Use RatpackServer and RatpackServerSpec to build our application |
| 2 | Use handlers to declare the Chain of our application |
| 3 | Define a Handler for HTTP GET / that renders a response to the user |
That’s really all that’s required to get started!
We’re now ready to start our application. We’ll invoke the run task then navigate to localhost:5050
$ ./gradlew :example-01-hello-world:run

$ curl -s localhost:5050 | cat
Привіт Світ
6.1. Continuous Mode
If you add -t or --continuous to the task execution, Gradle’s continuous mode will be invoked.
Gradle’s continuous mode monitors source code and reruns the specified task.
| Continuous mode cannot currently respond to changes in Gradle build scripts, only in source code or resources. |
$ ./gradlew :example-01-hello-world:run -t

$ curl -s localhost:5050 | cat
Привіт Світ

# modify HelloWorld.java

Change detected, executing build...

:example-01-hello-world:compileJava
:example-01-hello-world:processResources UP-TO-DATE
:example-01-hello-world:classes
:example-01-hello-world:configureRun
:example-01-hello-world:run
Ratpack started (development) for http://localhost:5050

$ curl -s localhost:5050 | cat
Привіт JEEConf 2016
7. Handlers
Handlers are where request processing logic is provided.
A Handler is a functional interface defined as void handle(Context context).
The context is a registry that provides access to a map-like data-structure that can be populated and queried.
Request and response objects are accessible via the Handler.
7.1. Request Response Interaction
Setting headers on the response
import ratpack.http.MutableHeaders;
import ratpack.server.RatpackServer;

public class App {
  public static void main(String[] args) throws Exception {
    RatpackServer.start(serverSpec -> serverSpec
      .handlers(chain -> chain
        .get(ctx -> {
          MutableHeaders headers = ctx.getResponse().getHeaders(); (1)
          headers.set("Access-Control-Allow-Origin", "*"); (2)
          headers.set("Access-Control-Allow-Headers", "x-requested-with, origin, content-type, accept"); (2)
          ctx.getResponse().send(); (3)
        })
      )
    );
  }
}| 1 | Access the response’s headers from the Context |
| 2 | Add some headers for implementing CORS functionality |
| 3 | Send an empty 200 OK response |
$ ./gradlew :example-02-cors-handler:demo -Papp=App (1)

$ curl -v localhost:5050/
* timeout on name lookup is not supported
*   Trying ::1...
* Connected to localhost (::1) port 5050 (#0)
> GET / HTTP/1.1
> Host: localhost:5050
> User-Agent: curl/7.45.0
> Accept: */*
>
< HTTP/1.1 200 OK
< Access-Control-Allow-Origin: * (2)
< Access-Control-Allow-Headers: x-requested-with, origin, content-type, accept (2)
< content-length: 0
< connection: keep-alive
<
* Connection #0 to host localhost left intact| 1 | Invoke demo task specifying App as our main class |
| 2 | Issue curl and inspect response headers to verify that our CORS headers are added |
7.2. Organization
Because our REST implementation requires that CORS is enabled, the Access-Control-Allow-Origin and Access-Control-Allow-Headers headers need to be set on every response.
However, setting these headers in each Handler is tedious and error prone.
Luckily Handler s are designed to be composable units of request processing.
Handlers are composed in a logical manner via the Chain.
Handlers can either send a response or delegate further request processing to the next Handler in the Chain.
Handlers signal delegation via Context#next.
We’ll start our refactoring by extracting the CORS setting logic to its own handler.
import ratpack.http.MutableHeaders;
import ratpack.server.RatpackServer;

public class App2 {
  public static void main(String[] args) throws Exception {
    RatpackServer.start(serverSpec -> serverSpec
      .handlers(chain -> chain
        .all(ctx -> { (1)
          MutableHeaders headers = ctx.getResponse().getHeaders();
          headers.set("Access-Control-Allow-Origin", "*");
          headers.set("Access-Control-Allow-Headers", "x-requested-with, origin, content-type, accept");
          ctx.next(); (2)
        })
        .get(ctx -> ctx.render("JEEConf 2016"))
        .get("foo", ctx -> ctx.render("foo"))
      )
    );
  }
}| 1 | Declare a new handler to handle all incoming requests regardless of method or path |
| 2 | Delegate processing to the next Handler in the chain |
We can curl the application to make sure that the headers are indeed being set for each request.
$ ./gradlew :example-02-cors-handler:demo -Papp=App2 (1)

$ curl -v localhost:5050/
* timeout on name lookup is not supported
*   Trying ::1...
* Connected to localhost (::1) port 5050 (#0)
> GET / HTTP/1.1
> Host: localhost:5050
> User-Agent: curl/7.45.0
> Accept: */*
>
< HTTP/1.1 200 OK
< Access-Control-Allow-Origin: * (2)
< Access-Control-Allow-Headers: x-requested-with, origin, content-type, accept (2)
< content-type: text/plain;charset=UTF-8
< content-length: 12
< connection: keep-alive
<
JEEConf 2016* Connection #0 to host localhost left intact

~
$ curl -v localhost:5050/foo
* timeout on name lookup is not supported
*   Trying ::1...
* Connected to localhost (::1) port 5050 (#0)
> GET /foo HTTP/1.1
> Host: localhost:5050
> User-Agent: curl/7.45.0
> Accept: */*
>
< HTTP/1.1 200 OK
< Access-Control-Allow-Origin: * (3)
< Access-Control-Allow-Headers: x-requested-with, origin, content-type, accept (3)
< content-type: text/plain;charset=UTF-8
< content-length: 3
< connection: keep-alive
<
foo* Connection #0 to host localhost left intact

$ curl -v localhost:5050/error
* timeout on name lookup is not supported
*   Trying ::1...
* Connected to localhost (::1) port 5050 (#0)
> GET /error HTTP/1.1
> Host: localhost:5050
> User-Agent: curl/7.45.0
> Accept: */*
>
< HTTP/1.1 404 Not Found
< Access-Control-Allow-Origin: * (4)
< Access-Control-Allow-Headers: x-requested-with, origin, content-type, accept (4)
< content-length: 0
< connection: keep-alive| 1 | Run App2 as the main class |
| 2 | Verify that CORS headers were added to GET / endpoint |
| 3 | Verify that CORS headers were added to GET /foo endpoint |
| 4 | NOTE: CORS headers were added even to non existent endpoints |
7.3. Standalone Handlers
As you can imagine, adding handler chains can grow pretty quickly. Ratpack provides ways to evolve your code base as your handlers and chains grow.
The idea is to migrate handling logic to discrete classes or groups of classes in order to keep code readable and maintainable.
import ratpack.handling.Context;
import ratpack.handling.Handler;
import ratpack.http.MutableHeaders;

public class CORSHandler implements Handler {
  @Override
  public void handle(Context ctx) throws Exception {
    MutableHeaders headers = ctx.getResponse().getHeaders();
    headers.set("Access-Control-Allow-Origin", "*");
    headers.set("Access-Control-Allow-Headers", "x-requested-with, origin, content-type, accept");

    ctx.next();
  }
}import ratpack.server.RatpackServer;
public class App3 {
public static void main(String[] args) throws Exception {
RatpackServer.start(serverSpec -> serverSpec
.handlers(chain -> chain
.all(new CORSHandler()) (1)
.get(ctx -> ctx.render("JEEConf 2016"))
)
);
}
}| 1 | Add the newly migrated CORSHandler to our Chain |
8. Database
In order to provide persistence to our REST application we’ll make use of a number of libraries. We’ll be using an in-memory h2 database as our main datasource, HikariCP — a very fast JDBC connection pool library, and jOOQ as our primary means of querying the datasource.
The Gradle build file should look something like this:
8.1. Updating Build Script
buildscript {
  repositories {
    jcenter()
  }
  dependencies {
    classpath 'com.h2database:h2:1.4.186'   (1)
    classpath 'org.jooq:jooq-codegen:3.8.1' (2)
  }
}

plugins {
  id 'io.ratpack.ratpack-java' version '1.3.3'
}

repositories {
  jcenter()
}

dependencies {
  compile ratpack.dependency('hikari') (3)
  compile 'com.h2database:h2:1.4.186' (4)
  compile 'org.jooq:jooq:3.8.1' (5)
}| 1 | Add h2 as dependency to buildscript |
| 2 | Add jooq-codegen as dependency to buildscript |
| 3 | Add compile time dependency on ratpack-hikari |
| 4 | Add compile time dependency on h2 |
| 5 | Add compile time dependency on jooq |
We needed to introduce a buildscript closure to the build script in order to provide these libraries during task execution.
The reason we couldn’t use the plugins DSL is because these h2 and jOOQ libraries are not published as Gradle plugins in the Gradle plugin portal.
We’ll add a task to our Gradle build script that enables us to generate the classes that reflect our schema.
If you notice (3) uses a distinct method to include the ratpack-hikari module.
The ratpack.dependency method is provided from the Ratpack Gradle plugin and it allows you to specify the module name in place of the full Group Artifact Version coordinates.
ratpack.dependency('hikari') in this context is equivalent to ’io.ratpack:ratpack-hikari:1.3.3'.
8.2. Defining the Schema
Our domain consists of a single entity, the Todo. We will add this initial sql script to our project’s resources directory.
DROP TABLE IF EXISTS todo;
CREATE TABLE todo (
  `id` bigint auto_increment primary key,
  `title` varchar(256),
  `completed` bool default false,
  `order` int default null
)
8.3. Generating jOOQ classes
We’ll make use of a fluent Java API provided by the jooq-codegen library, made available previously in the buildscript closure.
We’ll use this API and h2 to tell jOOQ how to connect to our datasource, which schemata/tables to include and where to place the generated files.
task jooqCodegen {
  doLast {
    String init = "$projectDir/src/main/resources/init.sql".replaceAll('\\\\', '/') (1)
    Configuration configuration = new Configuration()
      .withJdbc(new Jdbc()
      .withDriver("org.h2.Driver") (2)
      .withUrl("jdbc:h2:mem:todo;INIT=RUNSCRIPT FROM '$init'") (3)
    )
      .withGenerator(new Generator()
        .withDatabase(new Database()
          .withName("org.jooq.util.h2.H2Database")
          .withIncludes(".*")
          .withExcludes("")
          .withInputSchema("PUBLIC")
        )
      .withTarget(new Target()
        .withDirectory("$projectDir/src/main/java") (4)
        .withPackageName("jooq"))) (5)
    GenerationTool.generate(configuration)
  }
}| 1 | Grab our init script from the project, clean up path separator if on Windows |
| 2 | Configure jOOQ code generation to use h2 Driver |
| 3 | Configure h2 URL to run the init script |
| 4 | Specify the target directory |
| 5 | Specify name of parent package to contain generated classes relative to target directory |
Once this task is added, run it from the command line:
$ ./gradlew :example-03-database:jooqCodegen
:example-03-database:jooqCodegen

BUILD SUCCESSFUL

Total time: 0.985 secs
You should see the generated files in your project now:
├───java
│   │   App.java
│   │
│   └───jooq
│       │   DefaultCatalog.java
│       │   Keys.java
│       │   Public.java
│       │   Sequences.java
│       │   Tables.java
│       │
│       └───tables
│           │   Todo.java (1)
│           │
│           └───records
│                   TodoRecord.java
│
└───resources
init.sql (2)| 1 | Todo represents our table from our init.sql |
| 2 | Our TODO table definition |
8.4. Integration
Integrating the new datasource into our REST application is fairly straightforward. We need to register the H2 datasource and the Ratpack HikariCP module with Ratpack’s registry.
import ratpack.guice.Guice;
import ratpack.hikari.HikariModule;
import ratpack.server.RatpackServer;

public class App {
  public static void main(String[] args) throws Exception {
    RatpackServer.start(serverSpec -> serverSpec
      .registry(Guice.registry(bindings -> bindings (1)
        .module(HikariModule.class, config -> { (2)
          config.setDataSourceClassName("org.h2.jdbcx.JdbcDataSource"); (3)
          config.addDataSourceProperty("URL", "jdbc:h2:mem:todo;INIT=RUNSCRIPT FROM 'classpath:/init.sql'"); (3)
        })
      ))
      .handlers(chain -> chain
        .get(ctx -> ctx.render("JEEConf 2016"))
      )
    );
  }
}| 1 | Create a Guice registry that will be used to provide dependencies to the Ratpack registry |
| 2 | Add the HikariModule provided by ratpack.dependency('hikari') |
| 3 | Configure the HikariModule with our H2 connection information |
Next we’ll add a handler to perform some SQL query and send the result to the client.
.get(ctx -> {
  DataSource ds = ctx.get(DataSource.class); (1)
  DSLContext create = DSL.using(ds, SQLDialect.H2); (2)
  List<Map<String, Object>> maps = create.select().from(Todo.TODO).fetch().intoMaps(); (3)
  ctx.render(Jackson.json(maps)); (4)
})| 1 | Retrieve the DataSource registered from HikariModule from the Context |
| 2 | Create a DSLContext jOOQ object for querying the datasource |
| 3 | Issue a SELECT * FROM TODO; |
| 4 | Return results as JSON to the user |
We are now set to query from a datasource and send results as JSON to the client.
| Do not deploy this code! Our implementation is very naive and will cause very poor performance in production. We’ll continue in the next section in how to improve our implementation. |
9. Asynchronous Programming
At this point we should remember that Ratpack is a non-blocking and asynchronous framework.
This has implications in how you code your Handler logic.
If you are performing any kind of blocking I/O or any kind of computationally expensive operation, you’ll need to tap into Ratpack’s Blocking executor in order to let the main request processing thread continue processing requests.
If you fail to use the Blocking executor you will start to observe performance degradation.
9.1. Blocking.get()
In the previous example we were making a blocking JDBC call, preventing the request processing thread of execution from tending to any other incoming requests.
Ratpack provides a mechanism that allows you to create promises that will be executed on a separate thread pool.
We will use this Blocking mechanism to represent a bit of work that should not be performed on the request taking thread.
Promises are l-a-z-y.
Promises in Ratpack are not executed unless they are subscribed via Promise#then.
Promises will always be resolved in the order in which they were declared.
Ratpack promise execution is deterministic.
There is a detailed set of blog articles by @ldaley, the project lead of Ratpack that explains this.
Let’s rewrite the previous example using the Blocking mechanism.
.get(ctx -> {
  DataSource ds = ctx.get(DataSource.class);
  DSLContext create = DSL.using(ds, SQLDialect.H2);
  SelectJoinStep<Record> from = create.select().from(Todo.TODO);
  Promise<List<Map<String, Object>>> promise = Blocking.get(() -> from.fetch().intoMaps()); (1)
  promise.then(maps -> ctx.render(Jackson.json(maps))); (2)
})| 1 | Use Blocking.get to wrap the blocking JDBC call |
| 2 | Resolve the promise and render the JSON serialized representation to the user |
It should be noted that the strongly typed queries can be separated from their actual execution in jOOQ.
If the methods contain names like fetch*, refresh, execute, store, etc these are most likely the actual blocking JDBC call.
9.2. Code cleanup
At this point we’ll take the time to create a dedicated class that handles CRUD operations for the TODO table.
First we’ll create a TodoModel that represents our TODO domain model.
import com.fasterxml.jackson.annotation.JsonCreator;
import com.fasterxml.jackson.annotation.JsonProperty;

public class TodoModel {
  public final Long id;
  public final String title;
  public final boolean completed;
  public final Integer order;
  private final String baseUrl;

  @JsonCreator
  public TodoModel(@JsonProperty("id") Long id,
              @JsonProperty("title") String title,
              @JsonProperty("completed") boolean completed,
              @JsonProperty("order") Integer order) {
    this(id, title, completed, order, null);
  }

  public TodoModel(Long id, String title, boolean completed, Integer order, String baseUrl) {
    this.id = id;
    this.title = title;
    this.completed = completed;
    this.order = order;
    this.baseUrl = baseUrl;
  }

  public TodoModel baseUrl(String baseUrl) {
    return new TodoModel(id, title, completed, order, baseUrl);
  }

  public String getUrl() {
    return baseUrl + "/" + id;
  }

}
Next we’ll create a TodoRepository for performing CRUD operations on this TodoModel
Let’s start by migrating the SELECT * FROM TODO from the previous Handler
private final DSLContext create;

public TodoRepository(DataSource ds) {
  this.create = DSL.using(ds, SQLDialect.H2);
}

public Promise<List<TodoModel>> getAll() {
  SelectJoinStep all = create.select().from(TODO);
  return Blocking.get(() -> all.fetchInto(TodoModel.class));
}
We will now create a TodoModule that will provide this TodoRepository to the Ratpack registry.
import com.google.inject.AbstractModule;
import com.google.inject.Provides;

import javax.inject.Singleton;
import javax.sql.DataSource;

public class TodoModule extends AbstractModule {
  @Override
  protected void configure() {}

  @Provides
  @Singleton
  TodoRepository todoRepository(DataSource ds) {
    return new TodoRepository(ds); (1)
  }
}| 1 | We’re defining the TodoRepository as a singleton |
Next we’ll register this TodoModule with Ratpack
.module(TodoModule.class)Finally we’ll update the Handler to make use of the TodoRepository
.get(ctx -> {
  TodoRepository repository = ctx.get(TodoRepository.class); (1)
  Promise<List<TodoModel>> todos = repository.getAll(); (2)
  todos.then(t -> ctx.render(Jackson.json(t))); (3)
})| For style points use method references. |
.get(ctx -> {
  TodoRepository repository = ctx.get(TodoRepository.class);
  repository.getAll()
    .map(Jackson::json)
    .then(ctx::render);
})
Doesn’t that look lovely?
9.3. Putting it all together
Here is what the TodoRepository, TodoModule and App should look like at this point:
import jooq.tables.records.TodoRecord;
import org.jooq.*;
import org.jooq.impl.DSL;
import ratpack.exec.Blocking;
import ratpack.exec.Operation;
import ratpack.exec.Promise;

import javax.sql.DataSource;
import java.util.List;
import java.util.Map;

import static jooq.tables.Todo.TODO;

public class TodoRepository2 {

  private final DSLContext create;

  public TodoRepository2(DataSource ds) {
    this.create = DSL.using(ds, SQLDialect.H2);
  }

  public Promise<List<TodoModel>> getAll() {
    SelectJoinStep all = create.select().from(TODO);
    return Blocking.get(() -> all.fetchInto(TodoModel.class));
  }

  public Promise<TodoModel> getById(Long id) {
    SelectConditionStep where = create.select().from(TODO).where(TODO.ID.equal(id));
    return Blocking.get(() -> where.fetchOne().into(TodoModel.class));
  }

  public Promise<TodoModel> add(TodoModel todo) {
    TodoRecord record = create.newRecord(TODO, todo);
    return Blocking.op(record::store)
      .next(Blocking.op(record::refresh))
      .map(() -> record.into(TodoModel.class));
  }

  public Promise<TodoModel> update(Map<String, Object> todo) {
    TodoRecord record = create.newRecord(TODO, todo);
    return Blocking.op(() -> create.executeUpdate(record))
      .next(Blocking.op(record::refresh))
      .map(() -> record.into(TodoModel.class));
  }

  public Operation delete(Long id) {
    DeleteConditionStep<TodoRecord> deleteWhereId = create.deleteFrom(TODO).where(TODO.ID.equal(id));
    return Blocking.op(deleteWhereId::execute);
  }

  public Operation deleteAll() {
    DeleteWhereStep<TodoRecord> delete = create.deleteFrom(TODO);
    return Blocking.op(delete::execute);
  }
}import com.google.inject.AbstractModule;
import com.google.inject.Provides;
import javax.inject.Singleton;
import javax.sql.DataSource;
public class TodoModule2 extends AbstractModule {
@Override
protected void configure() {}
@Provides
@Singleton
TodoRepository todoRepository(DataSource ds) {
return new TodoRepository(ds);
}
}import ratpack.guice.Guice;
import ratpack.hikari.HikariModule;
import ratpack.jackson.Jackson;
import ratpack.server.RatpackServer;
public class App4 {
public static void main(String[] args) throws Exception {
RatpackServer.start(serverSpec -> serverSpec
.registry(Guice.registry(bindings -> bindings
.module(HikariModule.class, config -> {
config.setDataSourceClassName("org.h2.jdbcx.JdbcDataSource");
config.addDataSourceProperty("URL", "jdbc:h2:mem:todo;INIT=RUNSCRIPT FROM 'classpath:/init.sql'");
})
.module(TodoModule.class)
))
.handlers(chain -> chain
.get(ctx -> {
TodoRepository repository = ctx.get(TodoRepository.class);
repository.getAll()
.map(Jackson::json)
.then(ctx::render);
})
)
);
}
}10. Working with JSON
Now that we have our datasource and TodoRepository it’s time to implement the various Handler s for interfacing with the TodoRepository.
10.1. Parsing JSON
Ratpack has a parsing framework that understands how to parse incoming JSON to Pojos.
The Context#parse returns a Promise which will then provide the parsed JSON object.
.post(ctx -> {
  Promise<TodoModel> todo = ctx.parse(Jackson.fromJson(TodoModel.class)); (1)
  todo.then(t -> ctx.render(t.title)); (2)
})| 1 | We make use of Jackson.fromJson to specify our desired type |
| 2 | Once the promise is resolved we render the parsed title back to the user |
Let’s take a look at this JSON title rendering in action.
$ ./gradlew :example-05-json:demo -Papp=App (1)

$ curl -X POST -H 'Content-type: application/json' --data '{"title":"New Task"}' http://localhost:5050/
New Task

$ curl -X POST -H 'Content-type: application/json' --data '{"title":"Attend JEEConf 2016"}' http://localhost:5050/
Attend JEEConf 2016
10.2. Integrating with TodoRepository
Now that we see how easy it to parse incoming JSON, we’ll now update the Handler to persist this JSON payload.
.post(ctx -> {
  TodoRepository repository = ctx.get(TodoRepository.class); (1)
  Promise<TodoModel> todo = ctx.parse(Jackson.fromJson(TodoModel.class)); (2)
  todo
    .flatMap(repository::add) (3)
    .map(Jackson::json) (4)
    .then(ctx::render); (5)
})| 1 | Retrieve TodoRepository from Context |
| 2 | Parse incoming JSON payload |
| 3 | Add parsed JSON to repository |
| 4 | Map the resulting TodoModel as a renderable JSON object |
| 5 | Render the response to the client |
$ ./gradlew :example-05-json:demo -Papp=App2

$ curl -X POST -H 'Content-type: application/json' --data '{"title":"New Task"}' http://localhost:5050/
{"id":1,"title":"New Task","completed":false,"order":null,"url":"null/1"}

$ curl -X POST -H 'Content-type: application/json' --data '{"title":"Attend JEEConf 2016"}' http://localhost:5050/
{"id":2,"title":"Attend JEEConf 2016","completed":false,"order":null,"url":"null/2"}
10.3. Reading and Writing
Now that we’ve implemented the POST / endpoint for persisting Todo items, let’s put it together with GET /.
You may be tempted to write your chain in this way:
.get(ctx -> {
  TodoRepository repository = ctx.get(TodoRepository.class);
  repository.getAll()
    .map(Jackson::json)
    .then(ctx::render);
})
.post(ctx -> {
  TodoRepository repository = ctx.get(TodoRepository.class);
  Promise<TodoModel> todo = ctx.parse(Jackson.fromJson(TodoModel.class));
  todo
    .flatMap(repository::add)
    .map(Jackson::json)
    .then(ctx::render);
})
However you’ll run into some strange behavior:
$ ./gradlew :example-05-json:demo -Papp=App3

$ curl http://localhost:5050/
[]

$ curl -X POST -H 'Content-type: application/json' --data '{"title":"Attend JEEConf 2016"}' --raw -v -s http://localhost:5050/
* timeout on name lookup is not supported
*   Trying ::1...
* Connected to localhost (::1) port 5050 (#0)
> POST / HTTP/1.1
> Host: localhost:5050
> User-Agent: curl/7.45.0
> Accept: */*
> Content-type: application/json
> Content-Length: 31
>
* upload completely sent off: 31 out of 31 bytes
< HTTP/1.1 405 Method Not Allowed (1)
< content-length: 0
< connection: close
<| 1 | Method not Allowed?!?! |
10.4. ByMethodSpec
The way the Chain works is to eagerly match against incoming request path and then the HTTP method.
Because we declared .get(Handler) before .post(Handler), Ratpack will stop looking for handlers after it finds .get(Handler) since we’ve matched the request path.
The way to provide multiple methods for the same path is to use Chain#path and Context#byMethod.
.path(ctx -> { (1)
  TodoRepository repository = ctx.get(TodoRepository.class); (2)
  ctx.byMethod(method -> method (3)
      .get(() -> (4)
        repository.getAll()
          .map(Jackson::json)
          .then(ctx::render)
      )
      .post(() -> { (5)
        Promise<TodoModel> todo = ctx.parse(Jackson.fromJson(TodoModel.class));
        todo
          .flatMap(repository::add)
          .map(Jackson::json)
          .then(ctx::render);
      })
  );
})| 1 | Use Chain#path to match on path without HTTP method |
| 2 | Retrieve TodoRepository from Context |
| 3 | Use Context#byMethod to specify which HTTP methods are considered as valid methods for this path |
| 4 | Move previous Chain#get handler to the ByMethodSpec#get block |
| 5 | Move previous Chain#post handler to the ByMethodSpec#post block |
Now that we’re using Context#byMethod let’s check our results:
$ ./gradlew :example-05-json:demo -Papp=App4

$ curl http://localhost:5050/
[]

$ curl -X POST -H 'Content-type: application/json' --data '{"title":"Attend JEEConf 2016"}' http://localhost:5050/
{"id":1,"title":"Attend JEEConf 2016","completed":false,"order":null,"url":"null/1"}

$ curl http://localhost:5050/
[{"id":1,"title":"Attend JEEConf 2016","completed":false,"order":null,"url":"null/1"}]
10.5. Putting it all together
We will now combine the CORSHandler with all of the endpoints for performing REST CRUD operations.
import ratpack.exec.Promise;
import ratpack.guice.Guice;
import ratpack.hikari.HikariModule;
import ratpack.http.Response;
import ratpack.jackson.Jackson;
import ratpack.server.RatpackServer;

public class App5 {
  public static void main(String[] args) throws Exception {
    RatpackServer.start(serverSpec -> serverSpec
      .registry(Guice.registry(bindings -> bindings
        .module(HikariModule.class, config -> {
          config.setDataSourceClassName("org.h2.jdbcx.JdbcDataSource");
          config.addDataSourceProperty("URL", "jdbc:h2:mem:todo;INIT=RUNSCRIPT FROM 'classpath:/init.sql'");
        })
        .module(TodoModule.class)
        .bindInstance(new CORSHandler()) (1)
      ))
      .handlers(chain -> chain
          .all(CORSHandler.class) (2)
          .path(ctx -> { (3)
            TodoRepository repository = ctx.get(TodoRepository.class);
            Response response = ctx.getResponse();
            ctx.byMethod(method -> method
                .options(() -> {
                  response.getHeaders().set("Access-Control-Allow-Methods", "OPTIONS, GET, POST, DELETE");
                  response.send();
                })
                .get(() ->
                  repository.getAll()
                    .map(Jackson::json)
                    .then(ctx::render)
                )
                .post(() -> {
                  Promise<TodoModel> todo = ctx.parse(Jackson.fromJson(TodoModel.class));
                  todo
                    .flatMap(repository::add)
                    .map(Jackson::json)
                    .then(ctx::render);
                })
                .delete(() -> repository.deleteAll().then(response::send))
            );
          })
      )
    );
  }
}| 1 | Add our CORSHandler back into the registry |
| 2 | Ensure that all requests to go through CORSHandler |
| 3 | Setup logic for REST CRUD operations |
$ ./gradlew :example-05-json:demo -Papp=App5

$ curl http://localhost:5050/
[]

$ curl -X OPTIONS --raw -v -s http://localhost:5050/
* timeout on name lookup is not supported
*   Trying ::1...
* Connected to localhost (::1) port 5050 (#0)
> OPTIONS / HTTP/1.1
> Host: localhost:5050
> User-Agent: curl/7.45.0
> Accept: */*
>
< HTTP/1.1 200 OK
< Access-Control-Allow-Origin: *
< Access-Control-Allow-Headers: x-requested-with, origin, content-type, accept
< Access-Control-Allow-Methods: OPTIONS, GET, POST, DELETE
< content-length: 0
< connection: keep-alive
<

$ curl -X POST -H 'Content-type: application/json' --data '{"title":"Attend JEEConf 2016"}' http://localhost:5050/
{"id":1,"title":"Attend JEEConf 2016","completed":false,"order":null,"url":"null/1"}

$ curl http://localhost:5050/
[{"id":1,"title":"Attend JEEConf 2016","completed":false,"order":null,"url":"null/1"}]

$ curl -X DELETE http://localhost:5050/

$ curl http://localhost:5050/
[]
11. Evolution
As your codebase grows, so will your chains. Ratpack has several mechanisms for composing chains that help maintain readability.
11.1. Action<Chain>
Ratpack allows you to insert Action<Chain> s to the chain, which allows for basic composition.
In the following example we will take our chain and migrate it to a class that implements Action<Chain>.
We’ll also take this opportunity to leverage Ratpack’s InjectionHandler.
Up until this point we’ve been manually retrieving objects from the Context registry.
Ratpack provides a type of Handler that declares your registry objects by type to facilitate registry retrieval.
import ratpack.exec.Promise;
import ratpack.handling.Context;
import ratpack.handling.InjectionHandler;
import ratpack.http.Response;
import ratpack.jackson.Jackson;

public class TodoBaseHandler extends InjectionHandler { (1)
  public void handle (Context ctx, TodoRepository repository) throws Exception { (2)
    Response response = ctx.getResponse();
    ctx.byMethod(method -> method
      .options(() -> {
        response.getHeaders().set("Access-Control-Allow-Methods", "OPTIONS, GET, POST, DELETE");
        response.send();
      })
      .get(() ->
        repository.getAll()
          .map(Jackson::json)
          .then(ctx::render)
      )
      .post(() -> {
        Promise<TodoModel> todo = ctx.parse(Jackson.fromJson(TodoModel.class));
        todo
          .flatMap(repository::add)
          .map(Jackson::json)
          .then(ctx::render);
      })
      .delete(() -> repository.deleteAll().then(response::send))
    );
  }
}| 1 | Extend InjectionHandler |
| 2 | Provide a void handle() method that has our types of interest, in this case we want the TodoRepository |
We now create an instance of Action<Chain> that represents everything about REST CRUD interactions with Todo objects.
import ratpack.func.Action;
import ratpack.handling.Chain;

public class TodoChain implements Action<Chain> {
  @Override
  public void execute(Chain chain) throws Exception {
    chain.path(TodoBaseHandler.class);
  }
}
Once this is complete we can come back to the main application and update accordingly.
import ratpack.guice.Guice;
import ratpack.hikari.HikariModule;
import ratpack.server.RatpackServer;

public class App {
  public static void main(String[] args) throws Exception {
    RatpackServer.start(serverSpec -> serverSpec
      .registry(Guice.registry(bindings -> bindings
        .module(HikariModule.class, config -> {
          config.setDataSourceClassName("org.h2.jdbcx.JdbcDataSource");
          config.addDataSourceProperty("URL", "jdbc:h2:mem:todo;INIT=RUNSCRIPT FROM 'classpath:/init.sql'");
        })
        .module(TodoModule.class)
        .bindInstance(new CORSHandler())
        .bindInstance(new TodoBaseHandler()) (1)
        .bindInstance(new TodoChain()) (2)
      ))
      .handlers(chain -> chain
          .all(CORSHandler.class)
          .insert(TodoChain.class) (3)
      )
    );
  }
}| 1 | Register our new TodoBaseHandler |
| 2 | Register our new TodoChain |
| 3 | Insert our Action<Chain> that we have registered |
All of the previous REST CRUD functionality is preserved.
11.2. Implementing Individual Todo chain
We want to provide the ability to perform CRUD operations on an individual Todo basis.
We’ll make use of the TodoChain and InjectionHandler once again to provide this REST CRUD functionality.
This individual TodoHandler will handle REST CRUD functionality on a per Todo basis.
import com.google.common.collect.Maps;
import com.google.common.reflect.TypeToken;
import ratpack.func.Function;
import ratpack.handling.Context;
import ratpack.handling.InjectionHandler;
import ratpack.http.Response;
import ratpack.jackson.Jackson;
import ratpack.jackson.JsonRender;

import java.util.Map;

public class TodoHandler extends InjectionHandler {
  public void handle(Context ctx, TodoRepository repo, String base) throws Exception {
    Long todoId = Long.parseLong(ctx.getPathTokens().get("id"));

    Function<TodoModel, TodoModel> hostUpdater = todo -> todo.baseUrl(base);
    Function<TodoModel, JsonRender> toJson = hostUpdater.andThen(Jackson::json);

    Response response = ctx.getResponse();

    ctx.byMethod(byMethodSpec -> byMethodSpec
      .options(() -> {
        response.getHeaders().set("Access-Control-Allow-Methods", "OPTIONS, GET, PATCH, DELETE");
        response.send();
      })
      .get(() -> repo.getById(todoId).map(toJson).then(ctx::render))
      .patch(() -> ctx
        .parse(Jackson.fromJson(new TypeToken<Map<String, Object>>() {}))
        .map(map -> {
          Map<String, Object> m = Maps.newHashMap();
          map.keySet().forEach(key -> m.put(key.toUpperCase(), map.get(key)));
          m.put("ID", todoId);
          return m;
        })
        .flatMap(repo::update)
        .map(toJson)
        .then(ctx::render)
      )
      .delete(() -> repo.delete(todoId).then(response::send))
    );
  }
}
After implementing the TodoHandler we’ll need to add it to the registry and to the TodoChain.
import ratpack.func.Action;
import ratpack.handling.Chain;

public class TodoChain2 implements Action<Chain> {
  @Override
  public void execute(Chain chain) throws Exception {
    chain
      .path(TodoBaseHandler2.class)
      .path(":id", TodoHandler.class); (1)
  }
}| 1 | Making use of PathTokens to extract dynamic id parameter from path and assigning our TodoHandler to handle this path |
To finish this implementation we’ll the handler to the registry.
.bindInstance(new TodoHandler()) (1)11.3. Putting it all together
We’re adding String to the registry which represents base url of the REST api
|
import ratpack.handling.Context;
import ratpack.handling.Handler;
import ratpack.http.MutableHeaders;
import ratpack.registry.Registry;

public class CORSHandler implements Handler {
  @Override
  public void handle(Context ctx) throws Exception {
    MutableHeaders headers = ctx.getResponse().getHeaders();
    headers.set("Access-Control-Allow-Origin", "*");
    headers.set("Access-Control-Allow-Headers", "x-requested-with, origin, content-type, accept");
    String baseUrl = "http://" + ctx.getRequest().getHeaders().get("Host"); (1)
    ctx.next(Registry.single(String.class, baseUrl)); (2)
  }
}| 1 | Create a base url |
| 2 | Add base url to the registry |
$ ./gradlew :example-06-evolution:demo -Papp=App2

$ curl http://localhost:5050/
[]

$ curl -X POST -H 'Content-type: application/json' --data '{"title":"Attend JEEConf 2016"}' http://localhost:5050/
{"id":1,"title":"Attend JEEConf 2016","completed":false,"order":null,"url":"http://localhost:5050/1"}

$ curl http://localhost:5050/
[{"id":1,"title":"Attend JEEConf 2016","completed":false,"order":null,"url":"http://localhost:5050/1"}]

$ curl http://localhost:5050/1
{"id":1,"title":"Attend JEEConf 2016","completed":false,"order":null,"url":"http://localhost:5050/1"}

$ curl -X PATCH -H 'Content-type: application/json' --data '{"completed": true}' http://localhost:5050/1
{"id":1,"title":"Attend JEEConf 2016","completed":true,"order":null,"url":"http://localhost:5050/1"}

$ curl http://localhost:5050/
[{"id":1,"title":"Attend JEEConf 2016","completed":true,"order":null,"url":"http://localhost:5050/1"}]

$ curl -X DELETE http://localhost:5050/1


$ curl http://localhost:5050/
[]

$ curl http://localhost:5050/1
12. Deploying to Heroku
Heroku is PaaS that allows you to deploy you applications quickly. It’s a great way to "get something" out there while quickly iterating. You can prototype for free and once you’re ready to "go live" you can pay for your usage.
To get started you’ll need:
-
A Heroku account (no credit card required)
-
Heroku toolbelt — command line binaries for working with Heroku
12.1. Setup
In order to deploy our application to Heroku we’ll need two pieces of information:
-
A
Procfile -
A
stagetask when using Gradle
Let’s go over the changes we’ll need to make to the Gradle build script.
plugins {
  id 'io.ratpack.ratpack-java' version '1.3.3'
  id 'com.github.johnrengelman.shadow' version '1.2.3' (1)
}

repositories {
  jcenter()
}

mainClassName = 'todobackend.ratpack.TodoApp' (2)

task stage(dependsOn: installShadowApp) (3)| 1 | I recommend using Shadow plugin for packaging your Java applications for production |
| 2 | The Ratpack Gradle plugin applies application plugin, we need to declare our main entrypoint to the application |
| 3 | We create a stage task that invokes installShadowApp |
The second change we need to make is to add a file called Procfile.
This file is a signal that communicates to Heroku what command to invoke to start our application.
web: build/installShadow/example-07-heroku/bin/example-07-heroku12.2. Creating and deploying the application to Heroku
$  heroku apps:create (1)
Creating app... done, stack is cedar-14
https://infinite-ridge-35787.herokuapp.com/ | https://git.heroku.com/infinite-ridge-35787.git

$ heroku git:remote --app infinite-ridge-35787  (2)
set git remote heroku to https://git.heroku.com/infinite-ridge-35787.git

$ git remote -v (3)
heroku  https://git.heroku.com/infinite-ridge-35787.git (fetch)
heroku  https://git.heroku.com/infinite-ridge-35787.git (push)

$ git push heroku master (4)

$ heroku logs -t (5)

$ curl https://infinite-ridge-35787.herokuapp.com/todo (6)
[]| 1 | Create a new application (Heroku will assign a random name if you don’t) |
| 2 | Add heroku git repository to our remotes |
| 3 | View urls for the newly added git remote |
| 4 | Push our code to the newly minted heroku remote repository |
| 5 | Tail your application logs |
| 6 | Curl against your application in the wild! |
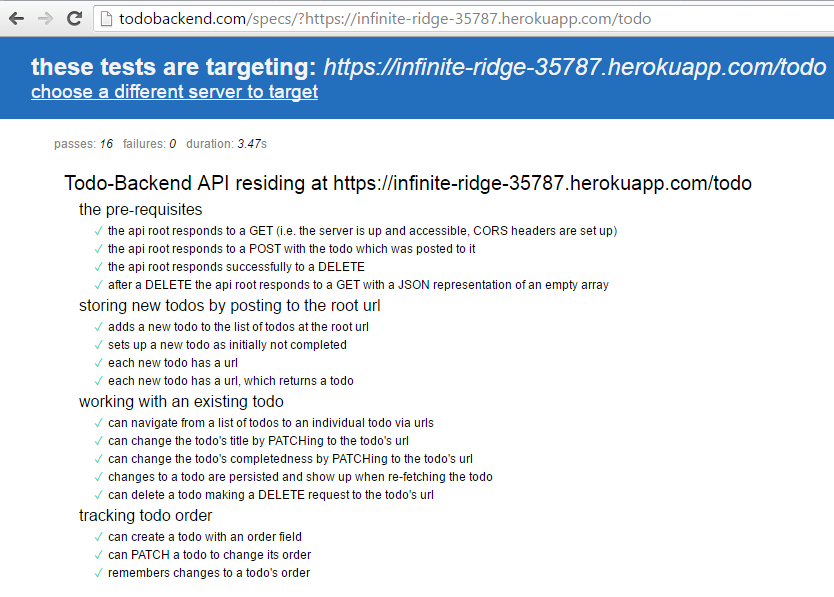
12.3. Final Product
With our application deployed and serving traffic, let’s finish by running the TodoBackend specifications against our application.
You can navigate to the specification page to see the tests in action: http://todobackend.com/specs/?https://infinite-ridge-35787.herokuapp.com/todo
You can similarly use our REST implementation against this sample Todo Frontend application.

13. Resources
- Learning Ratpack (Book)
-
Learning Ratpack O’Reilly 2016 by Dan Woods
- Slack
- User Guide and Javadoc
-
Official Ratpack Website (written in Ratpack of course)
- Forums